Showing posts with label fix-it. Show all posts

Thursday, August 4, 2011

Patch Wood Holes

First let me apologize for the horrible before and progress photos. This post has been in the making for a while but I had yet to take after photos until a few days ago so I'm finally getting around to finishing it.

Nearly two years ago I turned this TV bridge into a sideboard for our dining room. I removed the glass shelves and now use the cubbies to house wine racks and square storage baskets. However, the ghosts of shelves past left holes in the wood. The holes didn't bother me too much but I wanted to test my handy-woman skills by figuring out how to mask them without consulting Mr. Google. Fortunately I had an inkling it would be really similar to patching a small hole in a wall and I was right on the money.


First I gathered the tools I thought I would need. 1. Wood Filler. 2. Putty knife. 3. A sanding block. (4. Paint—not pictured.)


I used the putty knife to scrape some wood filler into and over each hole.


After allowing to dry, I sanded the heck outta that thing.


I repeated the filler/sand steps one more time until I was happy with the fill and smoothness of the holes.


To finish 'er off, I touched up the spots with the same white paint I used to repurpose the piece.


And restocked.


Now, no one's the wiser that there used to be shelves there, well, except for you of course!

Monday, January 3, 2011

Making Dad Proud

As Justin was doing some Thanksgiving weekend food preparations (specifically the pizza dough), he broke our countertop Kitchenaid stand mixer. Luckily, a few days later, on their way back to Minnesota from Florida, my parents and grandparents stopped for a free night at Hotel Scurte. In return for our generous hospitality, I enlisted my father and his mechanical skills in helping determine if the mixer would be easy to fix (and when I say help, it means I watch him do the dirty work).

After taking apart the head of the mixer, my dad pinpointed the problem to this gear, which I found out later to be called the worm gear. Of course it is the only non-metal machine part and a small section of the teeth had been smashed, so when the gear it worked with got to that part during rotation, the machine would skip or catch and stop. Fortunately, I was able to find a part list on Kitchenaid's website as well as a list of service and parts distributors. Ordering a replacement for this little guy wasn't cheap (about $35 with tax and shipping) but much cheaper than buying a new mixer ($150–300).

I received the part shortly after ordering it, but it took me about a week to build up the nerve and confidence to tackle this seemingly difficult and messy project. The photo below shows the old and busted part.


As my dad was taking the machine apart, I put everything into plastic bags to minimize and organize the mess. The bag on the right is full of grease, which I had to pile back in before putting it all back together—yuck!


Swapping the damaged part took all of 10 minutes and after the new one was in I couldn't help but do a victory dance all by myself in the middle of our kitchen.


Thirty minutes later, I had the mixer put back together and tested it several times to ensure it worked. As you can see from the photos below it did!


I called my dad almost immediately after I was done to brag about my success. I never would have guessed it would be so easy to fix this complex machine, but I did, and I did it all by myself! (I guess with a little help from my dad.)

Friday, June 4, 2010

Great Grad Gift

It's that time of year again, when kids will be flying their coops, as their parents watch with anticipation, fear, and pride. Although I don't personally know anyone graduating this year, hearing my coworkers excitement about attending grad parties made me think of my graduation and all the sweet gifts I got.

So, today, I am sharing with you one of my all-time greatest graduation gifts. However, I am kind of cheating when I call this a grad gift, because I didn't receive it until moving into my first off-campus apartment my sophomore year of college, but it was one of the practical things my parents bought me when I moved into my first off-campus apartment and it would have been extremely useful from day one my freshman year.

That said, I present to you the Rubbermaid Tough Tools Portable Kit.


This baby has it all: an adjustable wrench, needle-nose pliers, measuring tape, groove joint pliers, ratcheting screwdriver, level, hammer, and small selection of nails and screws. Since receiving it over five years ago, I have added a couple box cutters, a teeney-tiny level, a few allen wrenches, and some additional bits for the screw driver.


And speaking of the screwdriver, Rubbermaid really maximized the space because the end comes off, revealing a handy storage compartment for all the extra bits. There is even more storage in the divided container and is great for stashing extra screws, nails, and other odds-and-ends you collect over time.


But, the best part of all, is that you can zip it shut, around all three sides, and stow it in a small space. It's perfect for a dorm room or 400-square-foot apartment that doesn't even have a kitchen.


We keep ours in our coat closet on the first floor and it is the first thing we grab when needing a tool for a fix. Some people have a drawer where they keep a couple tools handy, but this works just fine for us. The final kicker (if I haven't sold you on it yet) is that it can be purchased for about $35 and in our opinion, is worth every penny. I highly recommend it as a gift for a fresh graduate, but also for anyone moving out on their own.

Wednesday, May 26, 2010

Compute this

On February 15, Best Buy launched an in-store e-cycling program in all of their US locations, and one of the many items they accept are old computers. Recently, my coworker got a new MacBookPro and chose to bring his old desktop PC in for e-cycling. However, before taking it, Best Buy told him to destroy his hard drive. The store had numerous reasons but their main one was that they did not want to be liable for the information on the disk. Fortunately, destroying a hard drive is an extremely easy process if it is less than five years old and a little more difficult if your computer is more than five years old, which my coworker's hard drive was, so he asked for my assistance. Also by destroying his hard drive, it reassures him to know that no one will be able to access the information in the future.

Generally, hard drives newer than five years have glass disks that a simple pound of a hammer will shatter, but hard drives that are more than five years old have metal disks that demand more extreme measures. Here is my coworker's ancient (in technology terms) 8-year-old 60GB Maxtor hard drive.


As you can see, it is pretty solid. So, to destroy this hard drive, I used my power drill to core a hole right through the area that the disks are in. My plan was to drill on each end of the drive to guarantee that the disk was thoroughly demolished.


After choosing my drill bit and making sure my safety goggles (my glasses) where in place, I got to it.


Justin wasn't home at the time, so while I held it down with one hand, my other hand held my power drill as it bore a hole in the drive.


Within a few minutes, I had successfully impaled the drive on one end.


And a short while later, the other end had a piercing to match.


I got a little drill happy and started a third, but it seemed my bit was exhausted and snapped in two. I took that as a sign to stop.


If you are still at a loss for how to disassemble and destroy your hard drive before recycling it, watch this video created by a few of Best Buy's Geek Squad agents.

Monday, February 22, 2010

Mac Maladies

When I started this blog, I told myself that I did not want to feel obligated to write a post apologizing for not posting, but since it's been over a week (and numerous people have checked in on me to see if everything is ok), I am back and quickly recapping the last 10 days of my mac's maladies (for those who are/were concerned).


Let me begin by setting the stage, I purchased my Apple Powerbook G4 in August 2004, when notebook computers were still being called laptops. Needless to say, as a designer, my computer is my #1 tool and this one has been for the last 5+ years. Therefore, when I started noticing a decrease in performance in the last year or two, I was not taken by surprise.

I have replaced the charger three times ($80 a pop) throughout my mac's life because of normal wear and tear and in the last six months bought a new battery, replacing my old-45-minute-charge battery with a new, up-to-4.5-hours-charge battery. And I must say, that $130 purchase was well worth it.

It was all hunky-dory for a while and then things went downhill fast. My mac began freezing, and not your occasional I've-been-abusing-her-no-wonder-she-froze, but a full blown, need-to-let-her-rest-for-24-hours-freeze. The. Worst. Kind. I knew this wasn't normal so I made an appointment at my local Apple store's Genius Bar and the genius gentleman, told me it was going to take a little while to check her out and promised to call me once he diagnosed the sickness. Twenty-four hours and three phone calls later, he reported that one of the two 512 MB memory cards was bad and recommended I replace both of the cards since they were really old. Happy that the memory was the only thing, I quickly ordered two 1 GB memory cards for $120 total. It took a week for the memory to arrive, but once they did, I popped them in, turned my computer over, and hit the power button. The moment of truth: she started up just fine, but (I'm guessing) halfway through the startup she froze and all of my attempts to revive her failed miserably.

So, back to the genius bar I went. This time, I was assigned to a different genius gentleman and after my 10 minute schpeel recapping the most recent events, he told me he thought it might be my hard drive hardware, but the only way to make sure was to wipe my current hard drive (completely erase everything: software, files, etc.) to see if that would clear up the problem. And that's the second time I left her with a stranger. Fortunately, it didn't take more than a couple hours before he called me back and told me that the wipe did not fix the problem, and instead I needed a new hard drive all together, another $150. Feeling like I had been painted into a corner, I called him back, told him to proceed, and waited for the final phone call telling me she was ready to be picked up.

Before Justin and I decided to have the hard drive replaced at the Apple store, we looked into various alternatives for the repair. We could have purchased a hard drive (about $90) and installed it ourselves, but after googling videos on that procedure we opted against it because we saw it would require removing 60+ screws and having to remember where they all went, no thank you. The second alternative we considered was having a third-party replace the drive; it would have cost about the same as at Apple, but they could not get it done in less than 5-7 business days. Therefore, we opted to fix it with Apple because we thought the charge was fair, they already had my computer on hand, and they said they could get it done in less than 24 hours.


Not even 18 hours later, I received the call that she was back together and better than ever. I rushed over to the store after work and was back in business on my train ride home. So, watch out for new posts this week!

Wednesday, February 3, 2010

Spackle it up

A couple weeks ago, we painted the small foyer and hallway by the entrance to our garage, but in the process of putting things back where they were, a mirror jumped off one of its hooks and gouged a small hunk out of our freshly painted wall.


After cursing gravity, I grabbed the tools needed to patch it up.
1. Sanding block
2. Spackle
3. Putty knife


The first thing I did was give the hole a light sanding so that there were no rough edges around the gash.


Then I took a small amount of spackle on the putty knife and scraped it across the hole a couple times, until I knew the hole was completely full.


Once the spackle was dry, I lightly sanded it again and ran my finger across the spot to make sure I got it as smooth and level with the wall that I could.


You may have to repeat the spackle and sand steps a few times until it is smooth, depending on the size of the gash and what type of spackle you have. Some spackle shrinks when it dries and other spackle doesn't shrink, so if you have a bunch of small holes in your wall from hanging things, you may want to spring for the non-shrinking kind. For this small hole, I only applied the spackle and sanded once.

Last but not least, I finished it up with a nice new coat of fresh paint.


Patching this small hole took no time at all and by doing it myself, I am confident it was done correctly and carefully. I hope this tutorial helps you fix that nagging scrape or gouge in your abode. It can make  a world of difference.

Thursday, January 28, 2010

Drain-oh-yuck

As I was in the process of re-caulking my shower one husband-free weekend day, I also gave my shower a much needed scrub down, and anyone who knows me, knows that when I clean, I don't beat around the bush. So when I got to the drain, I popped the cover off and got to work removing the built-up grime below the surface. I didn't think anything of it when I peered down the drain and only saw darkness, but I decided to try out a new tool that Justin and I received a couple months ago that boasts of clearing drains without the use of harsh chemicals. This tool, made by Bad Cat Solutions, is called the Drain Claw and to sum up its effectiveness in one word, AMAZING.


Basically what you do with the Drain Claw is stretch out the wire body, stick the end with the mascara-wand-like tip down the drain, twist around, hold your breath, and pull. So easy and completely natural. Our drain wasn't even clogged or slow, but this tool removed a mass of gunk so large that I can't believe water was still flowing through it. Words can't describe how disgusted I was upon seeing (and smelling) it either. All I can say is that if your drain is experiencing a slow down, I'm glad I'm not you! (No offense.) You can order a drain claw here or pick it up at your local Ace Hardware store. You're sure to have an experience for the books (and a clog-free drain).

Thursday, January 21, 2010

Join me in the shower

You know you have a problem, when you question whether or not you are actually getting clean in the shower. Well, this may be an over exaggeration, I clean my shower on a normal basis, but I need to get my point across. Justin and I have owned our home for almost two and half years and it is starting to show. The baseboards need a good wipe down (on my list) and up until now, the shower has been ok with getting a good scrub every couple weeks. However, when I noticed that the grime doesn't scrub out of some corners and joints anymore, I decided it was time to recaulk those areas and what better time than the present, right? So, when Justin picked up a whole day of refereeing middle school basketball games last weekend, I jumped at the chance to tackle this project solo mio.

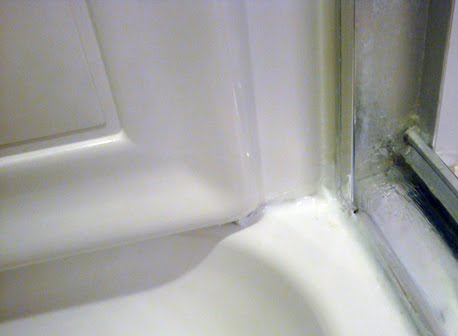
Within a couple hours time, I removed the old caulk, gave it a good cleaning, let it dry, and sealed it back up with new stuff. You may think I'm crazy to post photos of the nastiness in my shower, but once again, I need to get my point across and give justice to the before and after transformation. These are the areas that gave me the willies.

Right corner:


Left corner:


Middle:


Gross huh?

To complete my project, I rounded up the necessary tools.
1. White silicone kitchen and bath caulk
2. Flat nosed screw driver (to dig out old caulk)
3. Box cutter knife (to cut and dig out old caulk)
4. Putty knife  (to dig out old caulk and smooth new caulk if needed)


The first step was to remove the old caulk. Between my tool selection, I mainly used the knife and screw driver. I was able to make a few cuts, peel, and dig up the old stuff. FYI: If you use the knife, make sure you don't cut into the actual shower or bath surround.


Here are the problem areas free of their old caulk and already looking much better!

Right corner:


Left corner:


Middle:


Then, I cleaned the entire shower with some bleach water and cleaner. Once it was completely dry, I was ready to seal it up again with fresh caulk. (Make sure the areas are completely dry, otherwise you will have a problem applying the new caulk, it won't stick to the surface because it is waterproof.) The builder had used clear caulk originally, but I chose to replace it with white so that it had a nice crisp look.

The trick to caulking is to apply a small bead (thin line) of it


and smooth it out.


You can buy plastic tools that can be used to smooth and remove the excess but I used my finger instead. I have found that your finger is just as good as a $10 piece of plastic. And in a few short hours I had clean pristine shower corners.

Right corner:


Left corner:


Middle:


What a transformation! I will admit that this wasn't the most fun way I could have spent my husband-free Sunday, but it makes a huge difference and it's one thing I can cross off my list and not have to worry about for another couple years. Easy peasy! (If you plan on tackling your shower or bathtub, make sure you have an old rag on hand to wipe your finger off as you go, otherwise you could accidentally smear caulk everywhere. I'm speaking from experience.)

Note: I am not a professional carpenter, plumber, or electrician and the advice or steps I give are based on personal experience. In order to get professional results, it may be best to hire someone to do this job. If you are a professional and see that I have done this wrong, please let me know. I am always learning new things!

Thursday, November 19, 2009

ebay Creative Reuse

Today is the last day to enter your creative reuse for a chance at $1,000 ebay buck-a-roos. The ebay Green Team has united with DIY superstar Zem Joaquin of Ecofabulous to award a $1,000 shopping spree on ebay plus a personal consultation with the one and only Zem.


I entered my dining table that in a few short weeks I took from retro orange:


to chocolate chic.


I also entered my tv unit turned sideboard that I showed you last week (the contest allows one entry per day per email address). It started out as the topper to our entertainment stand


and ended up as a permanent and useful piece in our recently decorated dining room.


So, for your chance to win $1,000 in ebay cash enter your reuse project today! (Note: entries aren't limited to furniture. Some other entries include a dog collar made from old flour sacks and a purse made from plastic bags.)
Related Posts with Thumbnails