Showing posts with label mrs. clean. Show all posts

Thursday, July 28, 2011

Fabric sweeper? Fabric sweeper!

When I write a post, I start by popping in photos then narrating as I see fit, but when I saw the order of these images and began collecting my thoughts, I thought it looked like a silent commercial for this trusty cleaning tool or almost like a photographic madlib game (remember those?). However, for those of you who don't have an overactive imagination such as myself, I commented anyways.

(Look at this horrendously hairy chair seat! It looks like Big Foot spent a few too many hours here. How can we quickly remove all of that in a few minutes and without having to remove the chair cover to throw it in the dryer—because that works too?)


(I know! Let's try this new cleaning tool that swears it can remove pet hair that would otherwise use 145 sticky roller sheets to eradicate.)


(Ooooo looky-looky, with just a quick little side-to-side, swish-swish, the black pet hair begins to disappear from the ivory chair.)


(Leaving this freshly cleaned chair seat—awesome!)


(Although the packaging touts a one-time use out of the little sucker, anyone with eyeballs can figure out that by snapping out one of the rollers, the hair is easily removed and can be snapped back for another go.)


(Thanks Pledge Fabric Sweeper for Pet Hair! Our chair looks new!)


I felt this mighty-tool was worthy of a post because it is, as I already exclaimed, awesome. We only have two cats but even then, it seems their hair is everywhere, so when my mother-in-law gifted us this nifty-gadget she gave me the responsibility of reporting back on its effectiveness. Well, as you can see, it is effective, quick, and best of all reuseable and it not only worked on the smooth fabric of this chair but also our microfiber sectional—yippee!

Wednesday, March 10, 2010

Burning the Midnight Wax 2

In December, I posted a how-to on removing the hard-to-reach leftover bits and remains of wax a candle leaves in its jar once it has burnt out. Since then, I learned of a much better, easier, and safer way to do the same thing thanks to my mother-in-law. So when another candle flickered out last weekend, I thought what better time than now to try it out and boy, I'm glad I did!

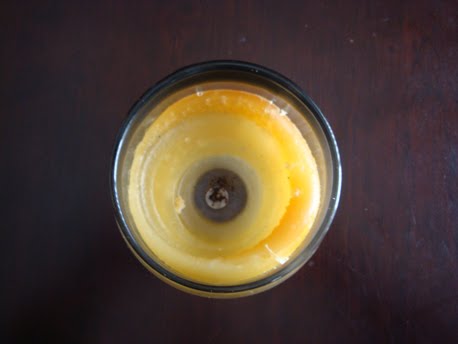
Here's my candle after the flame died.


You can see from above that it left a nice, thick ring of wax taunting me from the inside of the vase.


So, what I was told to do is soak the candle in warm, soapy water for an hour or so...


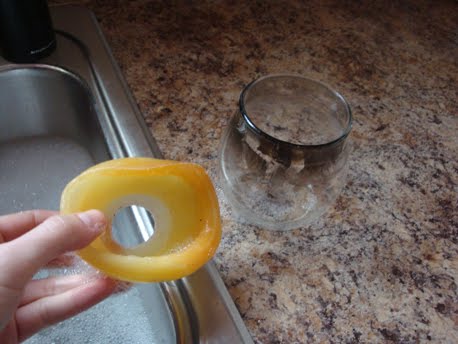
and the heat from the water makes the wax soft and malleable. In fact, my little hunk of wax loosened itself up and floated to the top of the jar.


All I had to do was grab a hold of that sucker and pull it out.


And the best part about this method is no waiting 24 hours for it to freeze. No knives. No potential to stab yourself as you slowly chip away at the wax.

Thursday, January 28, 2010

Drain-oh-yuck

As I was in the process of re-caulking my shower one husband-free weekend day, I also gave my shower a much needed scrub down, and anyone who knows me, knows that when I clean, I don't beat around the bush. So when I got to the drain, I popped the cover off and got to work removing the built-up grime below the surface. I didn't think anything of it when I peered down the drain and only saw darkness, but I decided to try out a new tool that Justin and I received a couple months ago that boasts of clearing drains without the use of harsh chemicals. This tool, made by Bad Cat Solutions, is called the Drain Claw and to sum up its effectiveness in one word, AMAZING.


Basically what you do with the Drain Claw is stretch out the wire body, stick the end with the mascara-wand-like tip down the drain, twist around, hold your breath, and pull. So easy and completely natural. Our drain wasn't even clogged or slow, but this tool removed a mass of gunk so large that I can't believe water was still flowing through it. Words can't describe how disgusted I was upon seeing (and smelling) it either. All I can say is that if your drain is experiencing a slow down, I'm glad I'm not you! (No offense.) You can order a drain claw here or pick it up at your local Ace Hardware store. You're sure to have an experience for the books (and a clog-free drain).

Thursday, January 21, 2010

Join me in the shower

You know you have a problem, when you question whether or not you are actually getting clean in the shower. Well, this may be an over exaggeration, I clean my shower on a normal basis, but I need to get my point across. Justin and I have owned our home for almost two and half years and it is starting to show. The baseboards need a good wipe down (on my list) and up until now, the shower has been ok with getting a good scrub every couple weeks. However, when I noticed that the grime doesn't scrub out of some corners and joints anymore, I decided it was time to recaulk those areas and what better time than the present, right? So, when Justin picked up a whole day of refereeing middle school basketball games last weekend, I jumped at the chance to tackle this project solo mio.

Within a couple hours time, I removed the old caulk, gave it a good cleaning, let it dry, and sealed it back up with new stuff. You may think I'm crazy to post photos of the nastiness in my shower, but once again, I need to get my point across and give justice to the before and after transformation. These are the areas that gave me the willies.

Right corner:


Left corner:


Middle:


Gross huh?

To complete my project, I rounded up the necessary tools.
1. White silicone kitchen and bath caulk
2. Flat nosed screw driver (to dig out old caulk)
3. Box cutter knife (to cut and dig out old caulk)
4. Putty knife  (to dig out old caulk and smooth new caulk if needed)


The first step was to remove the old caulk. Between my tool selection, I mainly used the knife and screw driver. I was able to make a few cuts, peel, and dig up the old stuff. FYI: If you use the knife, make sure you don't cut into the actual shower or bath surround.


Here are the problem areas free of their old caulk and already looking much better!

Right corner:


Left corner:


Middle:


Then, I cleaned the entire shower with some bleach water and cleaner. Once it was completely dry, I was ready to seal it up again with fresh caulk. (Make sure the areas are completely dry, otherwise you will have a problem applying the new caulk, it won't stick to the surface because it is waterproof.) The builder had used clear caulk originally, but I chose to replace it with white so that it had a nice crisp look.

The trick to caulking is to apply a small bead (thin line) of it


and smooth it out.


You can buy plastic tools that can be used to smooth and remove the excess but I used my finger instead. I have found that your finger is just as good as a $10 piece of plastic. And in a few short hours I had clean pristine shower corners.

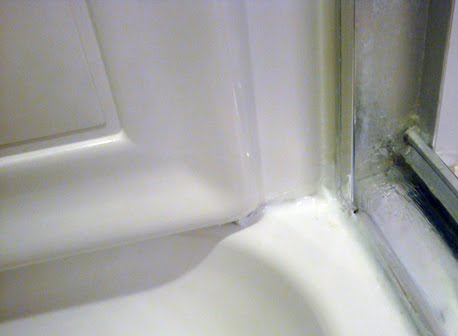
Right corner:


Left corner:


Middle:


What a transformation! I will admit that this wasn't the most fun way I could have spent my husband-free Sunday, but it makes a huge difference and it's one thing I can cross off my list and not have to worry about for another couple years. Easy peasy! (If you plan on tackling your shower or bathtub, make sure you have an old rag on hand to wipe your finger off as you go, otherwise you could accidentally smear caulk everywhere. I'm speaking from experience.)

Note: I am not a professional carpenter, plumber, or electrician and the advice or steps I give are based on personal experience. In order to get professional results, it may be best to hire someone to do this job. If you are a professional and see that I have done this wrong, please let me know. I am always learning new things!
Related Posts with Thumbnails