Showing posts with label steals-n-deals. Show all posts

Friday, July 22, 2011

Frikowscul

I never thought I would ever have this on my coffee table...or anywhere else near my home.


But I do and I love it.


I picked up this cow skull after seeing it posted on Freecycle and was nervous to hear Justin's response once I got home. Though after a few months, ok maybe six or more, Justin has only jokingly jabbed me about it and I don't think it's going anywhere.


Yes, cow skulls generally adorn only the best southwest-style decor but I felt that there was something so crazy-modern-cool displaying it in our more contemporary living space that I couldn't pass up.


And that makes me happy, which every good husband knows happy wife, happy life.

Thursday, January 20, 2011

Craigslist Gems

$15 for this Thonet-lookalike trio. Need I say more?


(Maybe I should add that I'm on the prowl for some new fabric for those sad, sad seats.)

Wednesday, October 27, 2010

2010 Halloween Decor

When I was spook-erating our house this year, I realized I never posted photos of our halloween decor from 2009. After digging through my old files, I found that not only do I NOT have photos from Halloween 2009, I don't have photos of our Halloween decor from any years past. However, I do have a photo of us in costume for Halloween 2008.


Fun right? Can you guess who we are? (Hint: Why it's grease lightning!)

But let's get back to the topic at hand. Our Halloween decor for this year, 2010! Here is our front step that I crime-scened-up with some caution tape and haunted house sign.


I have high expectations for the pumpkins also residing on our front step, but we'll see if I can wrangle some spare time this weekend to accomplish the feat.


In our front living room, I stretched more faux cobwebs over some of the furniture and filled a large, green recycled-glass bowl with medium sized gourds.


In our dining room, I heavily draped more faux cobwebs over the chandy and spruced up the tabletop and sideboard with fall themed tablescapes.


The faux spider webs came with these small plastic spiders which I strategically placed for added creepy factor.


I didn't go crazy in our family room and stuck to only changing up our mantel...a tad. For this I rearranged the vintage glass liquor bottles and made some basic white tapered candles more horrific by dripping melted red candle wax down them.


This yellow candlestick was an additional $1 Goodwill score when I picked up the items for the mini-cakestands I made for our kitchen tablescape.


As you can see I didn't go over the top with the heebie-jeebie decor this year, but I definitely feel the halloween vibe. Anyone else spook-up your decor?

Friday, October 15, 2010

Plates, candlesticks, and bowls, oh my!

In preparation of decorating our home for the upcoming Halloween holiday, I wanted to create a centerpiece for our square, counter-height table in our eat-in kitchen area. Taking advantage of the 1/2 price sticker day at Goodwill (Sundays and Mondays if you are wondering), I zipped over Sunday afternoon, donated the items that had begun to overspill our "Goodwill box" in the laundry room, and scoured their shelves looking for inspiration.

As I was browsing, I vaguely remembered a project on my want-to-do list that encompassed creating cake pedestals from recycled candlesticks and plates and some spray paint. So with a direction in mind, I began to pick out various sized candlesticks and plates. Once my basket was full, I situated myself in a conspicuous area in the shop and began playing around with the different sizes, heights, and quantities. I ended up arranging a group of three small stands at descending heights (groupings are always great in odd multiples). Orange was the color of the 1/2 price items that day, so I paid extra attention to selecting items with orange price tags.

Here is my thrift score from the search, which I walked away with for just under $6.


As you can see above, some of the items were quite dirty and the candlesticks had wax remnants, so as soon as I got home I washed them up and made sure I still remembered the arrangement I conjured up in Goodwill.


Then I took them out back and sprayed them with two coats of glossy black paint. VoilĂ , a trio of miniature cake stands.


I was a little concerned with the coverage on the clear glass candlestick (far back right) and the candlestick that had the painted flower detailing (front and center), but both turned out perfectly. In fact, the spray paint clung so well that I didn't even have any drips, a difficult feat for me! Now I can't wait to share my tablescape design with you. Check back Monday for all the gory details—bwah, ha, ha!

Wednesday, August 18, 2010

Revamp the Lamp

I have begun the great office decoranza but am taking it very slowly. Why? It might be because we just made some large purchases and our budget isn't all that flexible at the moment, but in actuality it is mostly because I can't come to a decision on my color palette until some little (and big) projects are finished first. So, in my (cough-cough) spare-time last week, I tackled one of those said projects on my list: revamping the lamp.

I bought this lamp base and shade from Goodwill so long ago that I can't remember what I paid for it (my guess is less than $5). Unfortunately, I forgot to snap a picture of the base before I painted it (shame on me!), but I have faith that you can imagine it a school bus yellow color. After a few quick coats of white gloss spray paint, the yellow was gone like a flash of light. However, the off-white shade with the white base was not doing it for me, so I tackled that next.


I had previously seen this DIY project Young House Love posted about recovering a drum shade and thought I could follow those steps to recover my lamp shade, no problem...that was until I realized my shade was not-so-much a drum shape but had a nice curve that I would have to account for. So, to modify their instructions, I made a template of the shade (similar to a pattern you would buy from a fabric store). I wrapped a large sheet of paper from a roll of newsprint I had picked up from my local newspaper for a previous project, taped it to the shade, drew an outline of where the edges ran, and cut that sucker out.


Then I pinned the template to my fabric and cut it about 1/4" larger which allowed enough fabric to wrap around and glue down on the interior of the shade.


As my glue gun was warming up, I quickly smoothed out the wrinkles with my iron and ironed a hem at the edge of the fabric that would be attached last.


I started by gluing down the raw edge of the fabric that I had not hemmed and proceeded to glue the edge of the fabric that circled the bottom of the shade. I didn't start gluing at the top of the shade because the circumference of the hoop was smaller and I didn't want to be stuck with fabric that was too tight when I started gluing the bottom of the shade.


Once the fabric was attached around the top and bottom edges, I dispensed a thin line of glue along the hemmed edge of the fabric, pulled it tight, affixed it to the shade, and called it a day.


The shade looks fantastic on the freshly painted base and I can't wait to use it in our to-be-decoranza'd office. And do you want to know the best part? I only spent a few bucks on the fabric to do it!


Anyone can handle this minimal DIY project. It was easy to complete and can change a dated lamp into an entirely different piece. Has anyone else recovered a lamp shade? Did you find it easy or was the shape difficult to work with? Send pics!

Wednesday, July 21, 2010

A new kind of paneling

To finish off my recent redecorating binge of our master bedroom, I pulled another curtain change-up. However, this time, I didn't swap the panels with another room's; rather, I tackled another sewing project and let me tell you, this takes paneling to a whole new level.

But before I get ahead of myself, this upgrade was not sparked by my brilliance alone, as Justin and I were making a Saturday morning stop at good 'ol HD (Home Depot), I spotted these roman bamboo blinds on mega-clearance. ($12 a piece! How lucky could we get?)


After discussing where we might hang these beauts (and consulting the notebook that I carry everywhere with dimensions of practically everything in our house—no joke), we decided they would look perfect in our master bedroom. We both loved the way our living room window turned out with the dark cocoa colored bamboo blinds and light, airy silk curtains, so after work one day, I trudged back to the Discount Fabric Outlet in Chicago and bought 12 more yards of the antique silk fabric ($3 per yard!) to make four more panels.

Before you scroll down any further, let me remind you of the old window treatments. They weren't terrible (heck, we lived with them for almost 3 years), but there was a bit too much dark chocolate brown going on for my taste.


This is how our room looks now and I'm so much happier. The bamboo blinds are a tad lighter than our furniture and have a slight reddish hue, which complements our paint color wonderfully. They also add another textural element, which elevates the rooms aesthetics. The light colored curtains frame the blinds serenely and pull the color from our bedding to create a more cohesive palette.


For what it cost to make these updates, I think we gained more than we spent (about $70). And it reminded us that our tastes are ever changing, so don't be afraid to make some simple changes. It might be worth more than you think!

Friday, July 16, 2010

The Paint Fairies Strike 4

I came down with the painting craze last weekend. You know you're infected with it when your 6'2" husband gets home and finds his 5'2"-wife teetering on a barstool trying to reach the ceiling corner so she doesn't have to wait until he gets home to help her and so she can say she did it all by herself. And only when a painting project is finished, in less than 12 hours (including a night of sleep), do you know she has survived it. To some, I may be considered the victim, but in fact, the victim this time was our second story hallway (see below).


For a while I have had the framed art and photos in place, but for some reason I never found the time or motivation to pick a color and paint. Then a few weeks ago, while perusing my local Home Depot, I found the perfect color in the oops bin and for $5, I was willing to take the risk and just go for it. In the end it was totally worth it.


I adore the sophisticated, soft, gray tone that welcomes you with a modern attitude. This space is so angular that when every bedroom door is open, funky shadows criss-cross each other creating artistic lighting. Not surprisingly, the paint color was a custom match, but if you want the same, bring in this information to Home Depot and they should be able to replicate it.
Base 1: GL6411
CLRNT
B: 2-OZ, 0-384th
C: 1-OZ, 304-384th
F: 0-OZ, 64-384th

Thursday, July 8, 2010

Undercover Box Spring

I didn't realize it until now, but I seem to be on a master bedroom re-decorating kick. The new bedding I bought not too long ago inspired the refreshed wall art hanging above the headboard, motivated today's post, and spirited another project I'm currently working on (stay tuned), not to mention several more ideas that I may try to tackle in the coming weeks. Nonetheless, today, I'm writing about our box spring, exciting eh?

I don't know about everybody else, but our box spring seems to be the tallest box spring ever. Now, don't get me wrong, it works great, providing support and stability, but I hate that it is visible above our bed frame. The second issue I have with it is that we have a king size mattress and the two twin box springs that reside under it are never lined up and to top it off, their quilted fabric cover reminds me of paper towels and worse, toilet paper.


So when I was making up our bed with its new duds, I couldn't help but to brainstorm how I could cover the little monsters.


Previously I had used a bed skirt, but I also hated it because it covered up our bed frame. I love the simple lines and wood tone of our bed, so away went the skirt. Then, while I was putting the sheets back on our bed, it hit me like a lightening bolt, a fitted sheet. The same as a skirt, but no dreadful overhang covering our wood frame and it would hold the two boxes together—eureka!


Thankfully, I didn't have to wait to try out my brilliant idea because I already had an extra fitted sheet in the same cream family as our other sheets (it was like it was meant to be).


After flipping our mattress on its side, I lined up the box springs and corralled them under the spare fitted sheet.


Then I flipped the mattress back on top, quickly made the bed, and voila, undercover box spring.


To the unaware (i.e. Justin's) eye, one would probably not notice the smooth lines of our single-looking box spring, but to me it makes all the difference.


The end result: no unaligned box springs peeking out and no frilly bed skirt covering the modern lines of our bed frame. Who else shares my sentiments towards box springs? Do you think they should be rightfully covered or left out to bare their quilted surfaces?

Thursday, July 1, 2010

Art Master

I started planning what to do with the wall art in our master bedroom immediately after remaking our bed with the new bedding I shared with you a few days ago.


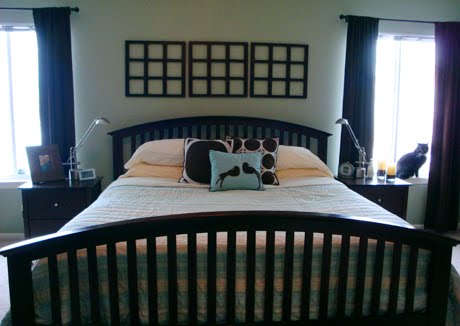
The first time I decorated our bedroom, I purchased these square grid photo frames. I originally bought one not knowing exactly what photos I was going to put in it or where it was going to go, but almost instantly when I got home I thought it would look cool if I lined up three of them above our headboard. So, the next time I was at the store, I snagged two more and if you can believe it, they had just been put on clearance. (I know, I'm one of the luckiest girls alive.)


After having them hung up, my next dilemma was deciding what to put in those empty spaces. The combination of the slats in our headboard, footboard, and empty frames made my head spin, so I needed something fast. Seeing as that they were going above our bed, I wasn't too thrilled with framing pictures of our family and friends, and I didn't think filling them with photos of us would look any better. (The words shrine, stalker, and creepy joined the spinning in my head.) So, I created some quick and easy art on my computer. You can see in this picture what I designed to match our previous red bedding, basic color backgrounds with thin bars of complementary and contrasting colors.


Up until now, these had been my art of choice however, with the new color scheme and design direction, I had to change it up. I played around with designing thin stripes and mimicking the geometric embroidery and birds on the decorative pillows, but I had a hard time thinking of something I absolutely loved. So, I printed sheets of solid colors, cut them up, and designed something on the fly.


I used the top of our bed, which the colors were pulled from, to try out various compositions of the blocks until I was happy with the balance and then started popping them in.


The interesting thing about these frames is that inside each square frame a groove has been cut, which holds the edges of the photo, or in my case, the art.


When a 5x7" is placed in, it curves slightly, adding dimension, texture, and a sculptural quality to whatever is framed.


When I designed the red art, I chose to alternate between horizontal and vertical placement, creating a weaving look, but this time I wanted more simplicity, so I positioned them all horizontally, mirroring the tiny stripes in our comforter. I also think it looks like rippling water, which I love!


So, what do you think about our refreshed, and better yet, free art?


I would have to say the best part is that if I have an art epiphany a few weeks from now I can swap out the old for the new in a few short minutes. (Or if I change our bedding again, it will be just as simple.) Anybody else have an art piece you can rotate with your changing decor, seasons, days, weather, or mood?
Related Posts with Thumbnails