Friday, January 29, 2010

String it up

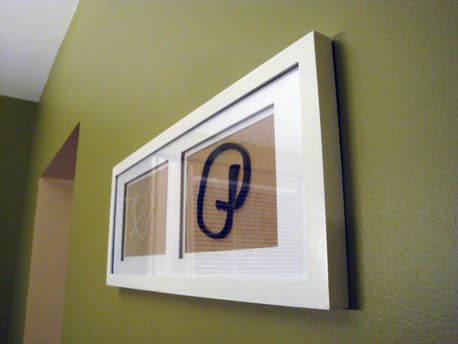
During our dining room decoranza, I created some quick and easy wall art on a dime. (See the two white horizontal pieces in this photo, on the back wall on the right.)


Here is what they look like up-close and personal.


My project was inspired when I was shopping at West Elm where I saw these sophisticated and modern framed art pieces highlighting basic art materials such as ink and string. When I saw them, I thought to myself, that's a perfect DIY project for the blank wall in the dining room!


I started off with two simple white frames, a variety of string, some paper shopping bags, double-sided tape, and super glue.


First I selected the backgrounds for my string art, cut the paper bags to fill the four 6x4" openings, and used the double-sided tape to tack the paper down.


Then I played around with the string until I came up with a design that I was happy with.


In order to keep the string in the shapes that I formed, I used tiny dots of super glue in a couple spots. This not only held the shapes, but also tacked the string down to the background paper.


It took less than a second for the super glue to dry so in no time, I popped them in the frames, hung them on the wall, and stepped back to admire my work.


I am really happy with the way they turned out and have received numerous compliments. If you're looking to hang some art in your home, but don't have the funds for what you see in stores, whip up a few of these, hang them in a row, and call them art. I do!

Thursday, January 28, 2010

Drain-oh-yuck

As I was in the process of re-caulking my shower one husband-free weekend day, I also gave my shower a much needed scrub down, and anyone who knows me, knows that when I clean, I don't beat around the bush. So when I got to the drain, I popped the cover off and got to work removing the built-up grime below the surface. I didn't think anything of it when I peered down the drain and only saw darkness, but I decided to try out a new tool that Justin and I received a couple months ago that boasts of clearing drains without the use of harsh chemicals. This tool, made by Bad Cat Solutions, is called the Drain Claw and to sum up its effectiveness in one word, AMAZING.


Basically what you do with the Drain Claw is stretch out the wire body, stick the end with the mascara-wand-like tip down the drain, twist around, hold your breath, and pull. So easy and completely natural. Our drain wasn't even clogged or slow, but this tool removed a mass of gunk so large that I can't believe water was still flowing through it. Words can't describe how disgusted I was upon seeing (and smelling) it either. All I can say is that if your drain is experiencing a slow down, I'm glad I'm not you! (No offense.) You can order a drain claw here or pick it up at your local Ace Hardware store. You're sure to have an experience for the books (and a clog-free drain).

Wednesday, January 27, 2010

Feeling Guilty

Every time Justin and I leave the cats at home when we go on vacation, I feel guilty and inevitably end up buying them treats or new toys. And when we went to Hawaii, it was no different, except that I supplied them with new toys before we left so they had some fun stuff to play with while we were gone. After presenting them with two new faux mice, I snapped some shots of them going wild.

Here they are not quite sure what to make of them...


and about 2 seconds later. (For those that are wondering, yes, that's Harley.)


Seeing that Harley was having all the fun, Benny decided to wait his turn...


until he saw an opening, snagged one for himself...


and tried to hide it in a basket that had been temporarily placed on the floor.


Anyone else feel guilty about leaving their canine, rodent, or feline family member at home when you go on a trip? Do you surprise them with a treat when you get home to get back on their good side?

Tuesday, January 26, 2010

Welcome to the Jungle

Of all the characteristics I have inherited from my mom, my green thumb is one of my favorites (and most useful). My mom's thumb is so green that she has been able to nurse an all-hope-is-lost Walmart clearance aisle plant back to it's original thriving life and one day, if I am called upon, I hope I can do the same!

I demonstrated my skills for keeping plants alive outdoors with my garden last summer and I have already started thinking about what veggies (and berries) I'm going to plant this year. But until then, I want to share the new frond-ly friends that are holding up residence in our recently decorated dining room (and the others that call our abode home as well).

I am pleased to announce the addition of rubber plant and corn plant...


and mother-in-law's tongue (also know as snake plant) and peace lily.


They were happily welcomed into the family by the others who convert carbon dioxide to oxygen, but warned not to hog all the water.


Houseplants can be expensive, depending on how big you buy them, but thanks to a buy-one-get-one-free coupon from an email I received from the Home Depot Garden Club, I was able to get all four newbies for under $20. I have also scored great deals on plants at my local grocery store and Ikea. Anyone else living in a jungle out there?

Monday, January 25, 2010

Bloomingdale's Big Window Challenge 2010

Bloomingdale's Big Window Challenge was unveiled last Wednesday at their flagship store in New York City and I love all three of the windows so much that I had to share their beauty and urge you to vote for your favorite one. Every year, Bloomingdale's invites three designers to design a window display highlighting Bloomingdale's furniture and this year the department store giant invited Eileen Joyce, Bloomingdale's Operating Vice President Interior Design; Maxwell Gillingham-Ryan, Founder of apartmenttherapy.com (AT); and Eddie Ross, Elle Decor Window Designer, to compete. I've been following their process the last couple weeks courtesy of Maxwell's emails from AT and it has been exciting to see their sketches go from paper to real-life.

Here is Maxwell's window titled: The Writer's Romantic Supper


Here is Eileen's window titled: The Urbane Traveler


Here is Eddie's window titled: The Modern Woman


Who do you choose? Cast your vote here.

Friday, January 22, 2010

Open for Business

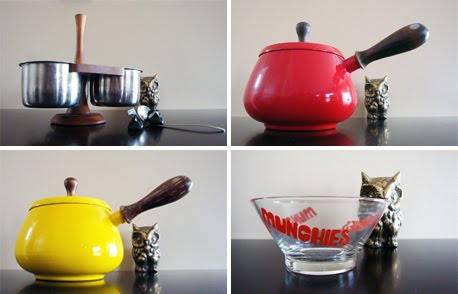
I have finally done it, my Etsy shop is open and ready for business and surprise, surprise my inventory features some great vintage treasures. I appropriately named my shop The Gilded Owl after my vintage gold owl that I absolutely love and picked up at Goodwill for a measly buck, almost the best dollar I have ever spent. As of right now, The Gilded Owl has only four items up (see them here, here, here, and here), but there will be more to come, I promise!


These are the items that I just listed, in case you were wondering.


For those who aren't familiar with Etsy...where have you been living, under a rock? (Just kidding!) But, seriously, you might want to get familiar quick! It is a great place where "you can buy and sell all things handmade" (and vintage). I have found super cute jewelry, home decor items, and inspiration for future projects.

So, not to deter you from your busy work schedule today, but check it out and keep your credit card close by! Happy Friday!

Thursday, January 21, 2010

Join me in the shower

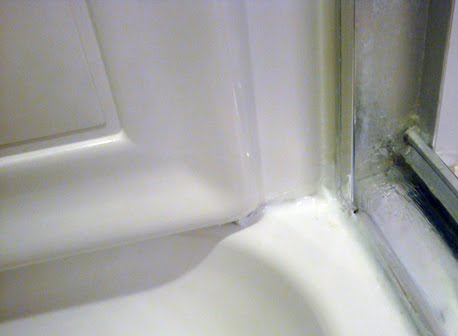
You know you have a problem, when you question whether or not you are actually getting clean in the shower. Well, this may be an over exaggeration, I clean my shower on a normal basis, but I need to get my point across. Justin and I have owned our home for almost two and half years and it is starting to show. The baseboards need a good wipe down (on my list) and up until now, the shower has been ok with getting a good scrub every couple weeks. However, when I noticed that the grime doesn't scrub out of some corners and joints anymore, I decided it was time to recaulk those areas and what better time than the present, right? So, when Justin picked up a whole day of refereeing middle school basketball games last weekend, I jumped at the chance to tackle this project solo mio.

Within a couple hours time, I removed the old caulk, gave it a good cleaning, let it dry, and sealed it back up with new stuff. You may think I'm crazy to post photos of the nastiness in my shower, but once again, I need to get my point across and give justice to the before and after transformation. These are the areas that gave me the willies.

Right corner:


Left corner:


Middle:


Gross huh?

To complete my project, I rounded up the necessary tools.
1. White silicone kitchen and bath caulk
2. Flat nosed screw driver (to dig out old caulk)
3. Box cutter knife (to cut and dig out old caulk)
4. Putty knife  (to dig out old caulk and smooth new caulk if needed)


The first step was to remove the old caulk. Between my tool selection, I mainly used the knife and screw driver. I was able to make a few cuts, peel, and dig up the old stuff. FYI: If you use the knife, make sure you don't cut into the actual shower or bath surround.


Here are the problem areas free of their old caulk and already looking much better!

Right corner:


Left corner:


Middle:


Then, I cleaned the entire shower with some bleach water and cleaner. Once it was completely dry, I was ready to seal it up again with fresh caulk. (Make sure the areas are completely dry, otherwise you will have a problem applying the new caulk, it won't stick to the surface because it is waterproof.) The builder had used clear caulk originally, but I chose to replace it with white so that it had a nice crisp look.

The trick to caulking is to apply a small bead (thin line) of it


and smooth it out.


You can buy plastic tools that can be used to smooth and remove the excess but I used my finger instead. I have found that your finger is just as good as a $10 piece of plastic. And in a few short hours I had clean pristine shower corners.

Right corner:


Left corner:


Middle:


What a transformation! I will admit that this wasn't the most fun way I could have spent my husband-free Sunday, but it makes a huge difference and it's one thing I can cross off my list and not have to worry about for another couple years. Easy peasy! (If you plan on tackling your shower or bathtub, make sure you have an old rag on hand to wipe your finger off as you go, otherwise you could accidentally smear caulk everywhere. I'm speaking from experience.)

Note: I am not a professional carpenter, plumber, or electrician and the advice or steps I give are based on personal experience. In order to get professional results, it may be best to hire someone to do this job. If you are a professional and see that I have done this wrong, please let me know. I am always learning new things!

Wednesday, January 20, 2010

Behr: Paint Your Place

After I posted mock-up photos of my proposed living room colors, I had a couple people ask me how I was able to digitally paint my space. Lucky for me, I own and know how to use photoshop and after a short while, was able to mask off the areas and splash some paint on my walls. While, this isn't helpful for people who don't have access to Photoshop, I do want to share with you a sweet online tool that essentially does the same thing courtesy of Behr. It is called Paint Your Place.


The functions in Behr's gadget are basically the same the same as Photoshop. You start by picking out your paint colors and then choosing to upload your photo or choose from their template photos (which is actually very fun to play with, come on, who has a bath tub placed in the middle of their bathroom? Be real people!).


Once you are at a point when you are ready to buy the paint, you can print out the photo sheet and bring it in to a Home Depot and they can mix up the paint for you. There is even a nifty paint calculator that helps determine how much paint you'll need for the project.


If you don't have time to finish up or want to create a couple different options (to show your husband), create an account and save your projects. Then when you login next time you'll go to your workbook and pick up where you left off or start on a different room.


This is what my room looks like from using the tool. Not too shabby, it definitely gets the idea across!


Has anyone else had some fun with this gadget or want an opinion on their paint color? I'd be happy to help, shoot me an email!

Tuesday, January 19, 2010

Party like it's 2009

This year, Justin and I threw our first ever New Year's Eve party. After the last couple years of going into Chicago to celebrate the ball drop, we realized that we just wanted to be with friends and there was no need to spend $100+ a person on tickets to a bash and a couple hundred on a hotel room. So, we planned a nice "grown-up" wine tasting soiree at our abode.

A week or two after Thanksgiving, I designed and mailed these invitations. I personally feel that laziness has taken over and people feel that an evite or mass email will suffice. Well, I hate to be Debbie Downer but there are certain times when an email is perfectly suitable (lunch with friends, card night, etc.) and other times when a paper invite is much better (birthday, holiday party, etc.) and for our occasion, I didn't want to downplay the sophistication of the party so I sent out printed invites.


They were inexpensive because I had the paper and envelopes already, and I kept them to front and back on one sheet which made them easy to produce.


We provided the food and munchies for the night and asked each person to bring their favorite bottle of wine for the wine tasting part.


Once everyone arrived, I uncorked the bottles and put them in paper bags, which hid the labels making the consumer blind to what he was drinking. I used curling ribbon to tie the bags tight at the top and randomly numbered them. I wrote all of the wine names on a large piece of poster board so when we were tasting we had a wine list to use as a reference for our guesses.


And a wine tasting wouldn't be complete without a tasting card! I whipped up these tasting cards and made a copy for each person. If you are planning a wine tasting party, feel free to use my design. You can get the file set up to print three per page here.


I had debated where I should hold the tasting (dining room? kitchen? basement?) but settled on our kitchen island. It was the perfect spot to hold it because there was enough space for everyone to gather around it.


On one counter, I set out a variety of glasses, dishes, napkins, straws, and utensils so that our guests could grab something when they needed it. At the last minute, we had Heineken on tap, thanks to our beer-tender, a birthday gift from Justin's mom.


I also snagged some inexpensive party poppers for the big countdown and dumped them into a vase for easy access come midnight. These were such a hit that next year, I think I'll create a party bar with paper horns, poppers, hats, and other noise makers.


In nearly every room, I lit candles and arranged fresh flowers in small vases to create an ambiance.


Since all of our guests were staying over at Hotel Scurte, I put coffee making items out on the counter so they could help themselves in the morning without rummaging through our cupboards. Justin and I don't drink coffee, so this single brew Keurig coffee maker is perfect when we have friends and family over.


So, from me and mine to you and your's, Happy New Year!


Did you host a New Year's Eve party? How'd it go? Was it a hit or a bang?
Related Posts with Thumbnails